Export and Import VMs using CLI
whitesky.cloud BV has its own Command Line Interface (CLI) that can help you with several commands. In this tutorial, we will check how we can use the whitesky.cloud BV CLI to export and import virtual machines using simple commands.
Download whitesky.cloud BV CLI
To get the whitesky.cloud BV CLI you can visit the Downloads section where you can download your whitesky.cloud BV CLI that is available for Linux, Windows and OS X operating systems (x86-64 only).
Install whitesky.cloud BV CLI
-
After downloading the whitesky.cloud BV CLI, open your download directory on your terminal.
-
Enter these commands to add the CLI to your machine environment variables, so it becomes accessible from any directory on your machine.
-
Change the mode of the CLI file.
chmod +x portal-whitesky-cloud -
Copy the CLI file into your system administration programs.
sudo cp portal-whitesky-cloud /usr/local/sbin -
Configure completion bash for your CLI.
source <(portal-whitesky-cloud completion bash) -
Configure your JWT Token.
portal-whitesky-cloud config auth-token update -
You will need to get your JWT from your account. Open the API tab on your whitesky.cloud BV portal from the left side menu, then click COPY JWT and paste it into your terminal.
-
Create a new folder on the system, then set this folder in the
PATHenvironment variable (e.g. C:\LinkScripts).-
If you don't know how to edit your environment variable on Windows 8 or Windows 10 follow these steps:
-
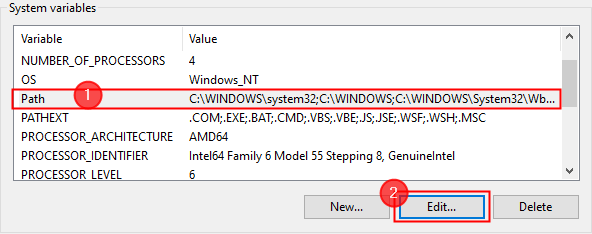
Open your Windows search and search for Environment Variables. In the System Variables section, select the PATH environment variable.
-
Click Edit. (If the PATH environment variable does not exist, click New)
-
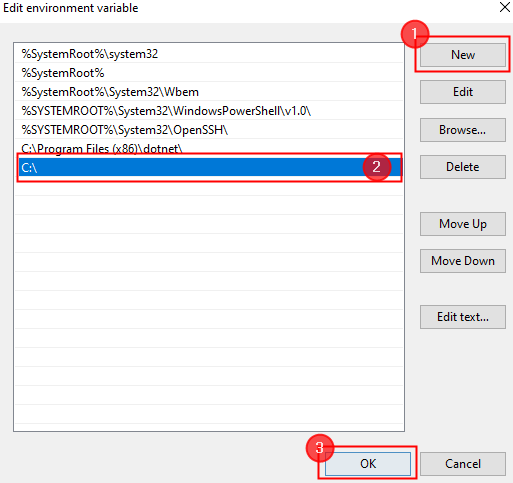
In the Edit System Variable (or New System Variable) window, specify the value of the PATH environment variable. Click OK.
-
Close all remaining windows by clicking OK.
-
-
-
Use MKLink to link the actual scripts in the other locations, and create a symbolic file link to each script to the new folder you created.
C:\WINDOWS\system32> md C:\LinkScripts C:\WINDOWS\system32> mklink C:\LinkScripts\portal-whitesky-cloud.exe C:\Users\Thinkpad\Downloads\portal-whitesky-cloud.exe -
Open a new instance of the command prompt once
PATHadjustments are made. -
Configure your JWT Token.
portal-whitesky-cloud config auth-token update -
You will need to get your JWT from your account. Open the API tab on your whitesky.cloud BV portal from the left side menu, then click COPY JWT and paste it into your terminal.
-
Now you have the whitesky.cloud BV CLI installed on your machine. To test your CLI, just open your terminal and type portal-whitesky-cloud. You will see the list of all available commands.
Export VMs Using CLI
In the commands list, you can see the command export which helps you export your VMs. To check the export command details enter the following command in your terminal.
portal-whitesky-cloud export vm --help
| Command | portal-whitesky-cloud export vm --help |
|---|---|
| Usage | portal-whitesky-cloud export vm CUSTOMER_ID CLOUDSPACE_ID VM_NAME EXPORT_DIR [flags] |
| Flags | |
| --api-timeout duration | API client timeout (default 3m0s) |
| --copy-chunk-size uint | Copy chunk size for disks during the export (default 131072) |
| --detect-zeroes | Detect zero blocks during the export (default true) |
| --disk-image-format string | Disk Image Format: qcow qcow2 raw vmdk (default "vmdk") |
| -h, --help | Help for vm |
| --iops uint | IOPS limit for disks during the export |
| --nbd-timeout duration | max time to wait for NBD server to become available (default 3m0s) |
| Global Flags | |
| --config string | Config directory |
| --gpg-agent | Whether to use gpg-agent for the passphrase of an encrypted config |
| --gpg-agent-cache-id string | gpg-agent cache ID to use for the passphrase of an encrypted config |
| --json | Format output as JSON |
| --log-level string | Log level, one of [panic fatal error warning info debug trace] (default "info") |
| --update-check | Whether to check for updates (default true) |
Export Step-by-Step Guide
-
You need to have a cloudspace that has at least one VM. If you don't know how to create a cloudspace and a VM, check the Cloudspace and VM documentations.
-
We will use the following command to export one of our VMs from the Cloudspace to our machine.
portal-whitesky-cloud export vm <CUSTOMER_ID> <CLOUDSPACE_ID> <VM_NAME> <EXPORT_DIR>- CUSTOMER_ID: can be found in the whitesky.cloud BV portal top bar or in the URL of the whitesky.cloud BV portal.
- CLOUDSPACE_ID: can be found when you hover over the cloudspace in the cloudspaces list or in the URL of the cloudspace.
- VM_NAME: the name of the virtual machine you want to export.
- EXPORT_DIR: the directory where the VM will be exported to.
-
We can use the following command to export a VM named "Testing VM" that belongs to CUSTOMER_ID "test_1" and CLOUDSPACE_ID "YmUtbWFjLWRjMDEtMDAxOjQ3Nw".
portal-whitesky-cloud export vm test_1 YmUtbWFjLWRjMDEtMDAxOjQ3Nw "TestinVM" export -
Wait until the command finishes exporting your VM. Then you will find the exported VM (.ova file) inside the export directory you entered in the command.
If you choose an export directory that does not exist, the command will create a new directory with the same name and use it as the export directory.
The time taken to finish the exporting process depends on the size of your VM and your internet speed.
Import VMs Using CLI
In the commands list, you can see the command import, which helps you import your VMs. To check the import command details enter the following command in your terminal.
portal-whitesky-cloud import vm --help
| Command | portal-whitesky-cloud import vm --help |
|---|---|
| Usage | portal-whitesky-cloud import vm CUSTOMER_ID CLOUDSPACE_ID [OVA | OVF] [flags] |
| Flags | |
| --api-timeout duration | API client timeout (default 3m0s) |
| --boot-type string | VM boot type used, should be one of BIOS, UEFI (overriding the default one or the one specified in OVF) |
| --copy-chunk-size uint | Copy chunk size for disks during the import (default 131072) |
| --detect-zeroes | Detect zero blocks during the import (default true) |
| --disk-model string | Disk model used, should be one of ide, lsilogic, sata (overriding the default one) |
| -h, --help | Help for vm |
| --image-name string | Image name of the VM |
| --image-type string | Image type of the VM, should be one of Linux, Windows, Unix, BSD, Darwin, Other |
| --iops uint | IOPS limit for disks during the import |
| --memory uint | Amount of memory (in MiB) for the VM (overriding the number specified in the OVF) |
| --name string | Name to use for the VM (overriding the one in the OVF) |
| --nbd-timeout duration | Max time to wait for NBD server to become available (default 3m0s) |
| --nic-model string | NIC model used, should be one of ne2k_pci, i82551, i82557b, i82559er, rtl8139, e1000, pcnet, virtio (overriding the default one) |
| --vcpus uint | Number of VCPUs for the VM (overriding the number specified in the OVF) |
| Global Flags | |
| --config string | Config directory |
| --gpg-agent | Whether to use gpg-agent for the passphrase of an encrypted config |
| --gpg-agent-cache-id string | gpg-agent cache ID to use for the passphrase of an encrypted config |
| --json | Format output as JSON |
| --log-level string | Log level, one of [panic fatal error warning info debug trace] (default "info") |
| --update-check | Whether to check for updates (default true) |
Import Step-by-Step Guide
-
You need to have a cloudspace. If you don't know how to create a cloudspace, check the Cloudspace documentation.
-
We will use the following command to import a VM to our Cloudspace.
portal-whitesky-cloud import vm CUSTOMER_ID CLOUDSPACE_ID [OVA | OVF] [flags]- CUSTOMER_ID: can be found in the whitesky.cloud BV portal top bar or in the URL of the whitesky.cloud BV portal.
- CLOUDSPACE_ID: can be found if you hover on the cloudspace in the cloudspaces list or in the URL of the cloudspace.
- [OVA | OVF]: the supported extensions for VMs.
-
Open the terminal and access the directory of the VM you want to import, then use the following command to import the VM (we will use the same data of the VM that we previously exported).
portal-whitesky-cloud import vm test_1 YmUtbWFjLWRjMDEtMDAxOjQ3Nw exported-vm-Testing\ VM-YmUtbWFjLWRjMDEtMDAxOjQ3Nw-test_1-be-mac-dc01-001.ova --image-name "Ubuntu server 20.04" --image-type Linux --memory 1024The flags --image-name and --image-type are mandatory in the import command. Additionally, for the memory flag the size should be a multiple of 1024.
-
Wait until the command finishes importing your VM. Then you can check your cloudspace on the whitesky.cloud BV portal where you will find the imported VM within the VMs list.
The time taken to finish the importing process depends on the size of your VM and your internet speed.