adminNotifications
As a whitesky.cloud BV admin, you can create email notifications and send them to the users who subscribed to receive notifications on your portal.
Notifications types:
- News & Updates: updating customers about new features on the portal. Notifications created in this category will be also visible on the home page portal.whitesky.cloud as a blog.
- Planned Maintenance: informing customers about planned maintenance windows on the cloud locations.
- Outage Warning: warning customers about possible service interruptions due to unexpectedly occurred issues on the cloud locations.
Notification origin
Notifications can be created in the portal in 2 different ways:
- Notification forwarding, when the notification is received from the cloud enabler who provides infrastructure for whitesky.cloud BV.
- Notification creation, when a whitesky.cloud BV admin creates the notification on the portal.
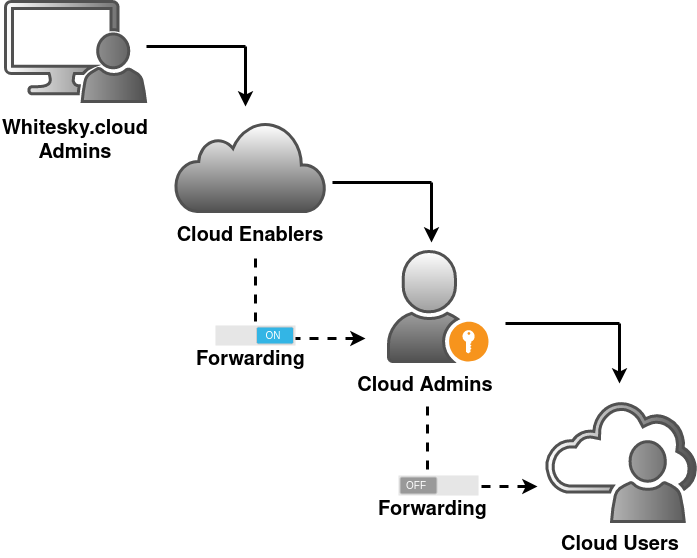
Notification forwarding flow
Notification forwarding flow consists of 4 levels, wherein notifications created on higher levels can be forwarded downwards:
-
Whitesky.cloud level. Whitesky.cloud delivers software to manage cloud infrastructure on the hardware of the cloud enablers, performs maintenance and technical support of the cloud locations. Notifications sent to cloud enablers:
- New functionalities introduced on the portal.
- Maintenance planned by Whitesky.cloud admins.
-
Cloud enabler level. A cloud enabler, or in this case GIG.Tech NV, enables cloud services and provides technical support for whitesky.cloud BV. Notifications sent to whitesky.cloud BV:
- GIG.Tech NV admins can forward all notifications published by Whitesky.cloud to the whitesky.cloud BV portal.
- GIG.Tech NV admins can create specific notifications, e.g. changing policies, prices or scheduling events/trainings.
-
Cloud admin level. Cloud admins, or in this case whitesky.cloud BV admins, manage the cloud portal configuration, assist customers of the portal, and provide support for the end users. Notifications sent to the whitesky.cloud BV users:
- whitesky.cloud BV admins can forward all notifications published by GIG.Tech NV to the end users.
- whitesky.cloud BV admins can create notifications, e.g. changing policies, prices or scheduling events/trainings.
-
Cloud user level. Cloud users, or in this case whitesky.cloud BV users, are the end consumers of the cloud services and the final receivers of the notifications created on levels 1-3.
Notification forwarding for whitesky.cloud BV
Navigate to Cloud Admin > Settings > General page to enable/disable notification forwarding.
Notification forwarding functionality allows forwarding email notifications released by the cloud enabler directly to the whitesky.cloud BV users. This way the users will be automatically notified about all the changes and warnings in the infrastructure without any extra effort from whitesky.cloud BV admins.
- Forwarding enabled: indicates that the notifications released by GIG.Tech NV will be directly forwarded to the users of whitesky.cloud BV. The notification will be listed on whitesky.cloud BV admin notification list in status SENT.
- Forwarding disabled: indicates that forwarded notifications will appear for whitesky.cloud BV admins in status DRAFT, hence the admins will have an opportunity to edit the notification content before sending it to the end users.
Notification management on whitesky.cloud BV
Notification lifecycle
-
Status DRAFT indicates that the notification was created and saved, but not published or sent to anyone. Applicable actions:
- Edit notification
- Delete notification
- Copy notification
- Send preview
- Send notification to the mailing list
Deleted notifications cannot be restored.
-
Status SENT indicates that the notification was successfully published and sent to the mailing list. Applicable actions:
- Copy notification
- Send preview
- Resend notification to the mailing list
In status SENT, you cannot delete or edit notifications. If you want to create a similar notification, use COPY functionality.
List notifications
- Navigate to Cloud Admin > Notifications to see the notifications list.
- Enable Include past toggle to include the notifications with a passed due date in the list. This is applicable only to notifications related to a specific time window, for example, planned maintenance.
Create notification
- Navigate to Cloud Admin > Notifications to see the notifications list
- Click New Notification, notification creation form will open.
- Select the notification type and fill in the notification details.
- Click Create.
Notification text editor capabilities
Notification text editor is a basic editor that supports all standard formatting tools like common fonts, aligning, resizing and styling text, using ordered and unordered lists, hyperlinks and attaching images.
The total attachment size limit for images is 1MB.
Placeholders
To make it easier for the user to create an email, we provide predefined templates for some notification types. For example, if you create a planned maintenance or an outage warning, a minimal template with several placeholders will appear in the content field. The placeholders will be rendered with the relevant notification metadata, once you send the notification for the first time.
start_time and end_time placeholders are replaced with the dates in the UTC timezone when creating a notification. However, when sending notification emails they will be replaced again with the timezone of whitesky.cloud BV.
Send notifications
To send a notification to its mailing list, click Send on the notification's details page.
Send notification preview
To send a preview of the notification, click Send Preview on the notification's details page.
The Send preview functionality allows sending the created notifications to a group of emails that you can manually add. This allows you to validate the email and how it looks before sending it to the customers.
Copy notifications
To create a copy of the current notification, click Copy on the notification's details page.
Copying notifications allows creating a new notification based on an existing one. All the fields and the type of the new notification will be inherited from the original. A new notification will be created in the status DRAFT, which allows you to edit or delete it.
The notification type of the copied notification is inherited from the original and cannot be changed.
Create blog
The notifications created on the portal have the option to be shared with the customers as blog posts on the welcome page. This can be done together or instead of sending email notifications.
To create a blog of the current notification, click CREATE BLOG on the notification's details page. Click BLOG PREVIEW to preview your blog and see how it will appear on the portal prior to publishing.
The cloud enabler admins can create and manage blogs on the new features in the platform and infrastructure updates in an automated way. whitesky.cloud BV admins can edit or delete automatically added blogs if need.
All notifications will have Blog status: Not created be default. Once you choose to create a blog the status will be changed to Published.
Mailing list
The mailing list for each notification is constructed based on the users' email subscriptions. Each user of the portal can choose which locations and which notification types they are willing to receive.
Emergency Notifications
The emergency notification feature enables the notification of customers and whitesky.cloud BV admins in the event of potential impact due to VM migration from one CPU node to another resulting in a reboot.
- For Customer admins
- Emergency Notifications can be found on the left navigation drawer under Admin
- For whitesky.cloud BV admins
- Emergency Notifications can be found on the left navigation drawer under Cloud admin > Settings > Emergency Notifications.
You can subscribe to receive updates for all your locations or choose your own customization per each location.