Install checkmk agent on multiple VMs
Checkmk is a powerful and comprehensive monitoring system that enables administrators to monitor their IT infrastructure efficiently. The Checkmk system includes a wide range of monitoring capabilities such as host and service monitoring, network monitoring, log file monitoring, and more.
One of the key features of Checkmk is its ability to monitor multiple virtual machines simultaneously. In this guide, we will walk you through the process of installing the Checkmk agent on multiple virtual machines running Linux and Windows operating systems.
Checkmk benefits
Checkmk is designed to help system administrators monitor their IT infrastructure effectively and efficiently. Some of the key benefits of using Checkmk include:
-
Centralized monitoring: Checkmk allows administrators to monitor multiple systems from a central location, making it easier to manage and troubleshoot issues.
-
Automated monitoring: Checkmk can automate the process of monitoring systems, enabling administrators to focus on more important tasks.
-
Customizable monitoring: Checkmk is highly customizable, allowing administrators to configure monitoring based on their specific needs and requirements.
-
Easy to use: Checkmk's user-friendly interface makes it easy for administrators to navigate and manage the monitoring system.
Installing Checkmk Agent on Linux VMs
Prerequisites
Before you start installing the Checkmk agent on your Linux VMs, make sure you have the following:
- A Cloudspace with multiple VMs to monitor.
- Checkmk dashboard installed on your server VM.
- QEMU agent up and running on all your VMs.
- whitesky.cloud BV CLI configured on your server VM. You can refer to the CLI guide to download and configure the whitesky.cloud BV CLI on your machine.
jqinstalled on your server VM. You can install it usingsudo apt install jq.
Note: This guide is tested on Windows and Linux-based VMs only. For other OS types, you can update the scripts to suit your case.
Installation guide for Linux-based VMs
Follow the below steps to install the Checkmk agent on your Linux-based VMs:
Note: All scripts' variables must be replaced with their equivalent values before execution. (For example, replace CUSTOMER_ID and CLOUDSPACE_ID with your actual customer and cloudspace IDs.)
-
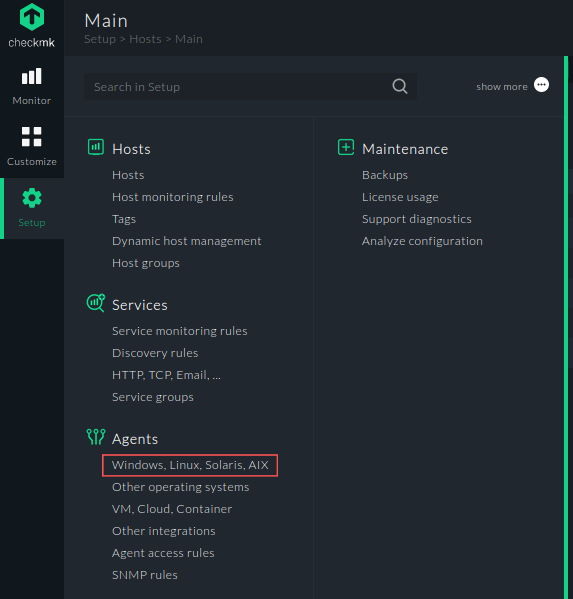
Download the Checkmk agent from the Checkmk dashboard. You can find it under Setup > Agents > Windows, Linux, Solaris, AIX on your server VM.
-
Rename the downloaded agent file to
check-mk-agent.debfor Linux VMs andcheck-mk-agent-win.msifor Windows VMs. -
Copy the Checkmk agent file from the current directory to the Checkmk HTTP server directory.
cp /home/user/Downloads/check-mk-agent.deb /var/www/html/
cp /home/user/Downloads/check-mk-agent-win.msi /var/www/html/
-
Create a bash script file named
install-mkagent.shwith the following lines.
#!/bin/bash
wget http://<CHECKMK_SERVER>/check-mk-agent.deb
DEBIAN_FRONTEND=noninteractive dpkg -i check-mk-agent.deb
cmk-agent-ctl register --hostname $HOSTNAME --server <CHECKMK_SERVER> --site cmk --user automation --password <AUTOMATION SECRET> --trust-cert
$name=$args[0]
Invoke-WebRequest -Uri 'http://<CHECKMK_SERVER>/check-mk-agent-win.msi' -OutFile 'C:\Users\user\Downloads\check-mk-agent-win.msi'
msiexec /i C:\Users\user\Downloads\check-mk-agent-win.msi /qb-! WIXUI_CLEANINSTALL=

New-NetFirewallRule -DisplayName "Allow ICMPv4-In" -Protocol ICMPv4

$var = '"C:\Program Files (x86)\checkmk\service\cmk-agent-ctl.exe" register --hostname $name --server <CHECKMK_SERVER> --site cmk --user automation --password <AUTOMATION SECRET> --trust-cert'
Start-Process -Verb RunAs cmd.exe -Args '/c', $var
-
Replace
CHECKMK_SERVERwith your Checkmk domain or IP address andAUTOMATION SECRETwith the password that you can configure on Checkmk dashboard under Setup > Users > Automation > Security > Automation secret for machine accounts. -
Create a bash script file named
uploading-script.shon your server VM, this script will upload the agent installation script to all the VMs in your cloudspace.#!/bin/bash # Loop through virtual machines for vm_id in `./portal-whitesky-cloud customers list-cloudspace-virtual-machines --customer-id <CUSTOMER_ID> --cloudspace-id <CLOUDSPACE_ID> --json | jq .Payload.result[].vm_id` do image_id=`./portal-whitesky-cloud customers get-virtual-machine-info --customer-id <CUSTOMER_ID> --cloudspace-id <CLOUDSPACE_ID> --vmid=${vm_id} --json | jq .Payload.image_id -r` location=`./portal-whitesky-cloud customers get-cloudspace-info --cloudspace-id <CLOUDSPACE_ID> --customer-id <CUSTOMER_ID> --json | jq --raw-output .Payload.location` os_type=`./portal-whitesky-cloud customers get-image --customer-id <CUSTOMER_ID> --location=${location} --image-id=${image_id} --json | jq .Payload.os_type -r` # Set the payload filepath and content based on the OS type if [[ "$os_type" == "Windows" ]]; then payload_filepath="C:\Users\user\Downloads\install-agent-win.ps1" payload_content="base64 -w 0 install-agent-win.ps1" else payload_filepath="/root/install-mkagent.sh" payload_content="base64 -w 0 install-mkagent.sh" fi # Write the file based on the payload filepath and content ./portal-whitesky-cloud customers write-file --customer-id <CUSTOMER_ID> --cloudspace-id <CLOUDSPACE_ID> --vmid ${vm_id} --payload.append=false --payload.filepath ${payload_filepath} --payload.content ${payload_content} done -
Run the
uploading-agent.shscript../uploading-agent.shNote: In case you faced a problem with your JWT when running the uploading script, check the JWT configuration on whitesky.cloud BV portal.
Note: If you have multiple VMs across multiple cloudspaces, you can update the scripts to loop over the list of your cloudspaces that include the VMs you want to monitor. Then, you can simply loop on each cloudspace over the available VMs.
-
Create a bash script file named
import-script.shon your server VM, this script will create a.csvfile with two columns for your VMs' names and IP addresses.#!/bin/bash # Loop through virtual machines for vm_id in `./portal-whitesky-cloud customers list-cloudspace-virtual-machines --customer-id <CUSTOMER_ID> --cloudspace-id <CLOUDSPACE_ID> --json | jq '.Payload.result[].vm_id'` do name=`./portal-whitesky-cloud customers get-virtual-machine-info --customer-id <CUSTOMER_ID> --cloudspace-id <CLOUDSPACE_ID> --vmid=${vm_id} --json | jq .Payload.name -r` ip=`./portal-whitesky-cloud customers get-virtual-machine-info --customer-id <CUSTOMER_ID> --cloudspace-id <CLOUDSPACE_ID> --vmid=${vm_id} --json | jq .Payload.network_interfaces[0].ip_address -r` echo "${name};${ip}" >> import-hosts.csv done -
Run the
import-script.shscript../import-script.sh -
Go to your Checkmk dashboard, click on Setup > Hosts, then select Hosts > Import hosts via CSV file from the top navigation drawer.
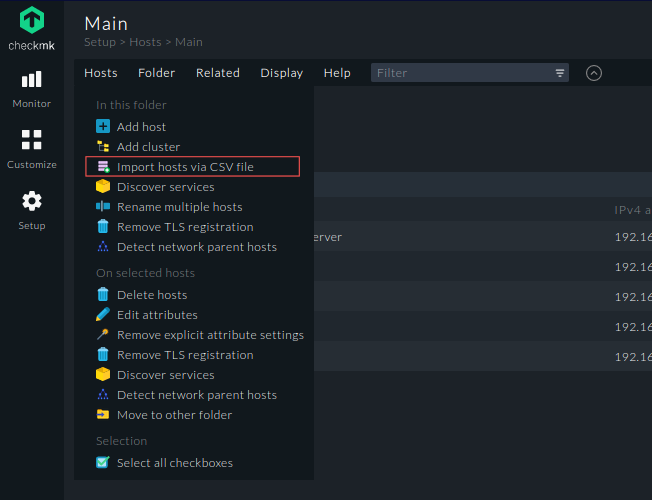
-
Under Import Hosts, select Upload CSV file, click Browse to locate the CSV file created using
import-script.sh, then click Upload. -
Create a bash script file named
execute-agents.shon your server VM, this script will execute all the installation scripts across your VMs.#!/bin/bash # Loop through virtual machines for vm_id in `./portal-whitesky-cloud customers list-cloudspace-virtual-machines --customer-id <CUSTOMER_ID> --cloudspace-id <CLOUDSPACE_ID> --json | jq '.Payload.result[].vm_id'` do image_id=`./portal-whitesky-cloud customers get-virtual-machine-info --customer-id <CUSTOMER_ID> --cloudspace-id <CLOUDSPACE_ID> --vmid=${vm_id} --json | jq .Payload.image_id -r` location=`./portal-whitesky-cloud customers get-cloudspace-info --cloudspace-id <CLOUDSPACE_ID> --customer-id <CUSTOMER_ID> --json | jq --raw-output .Payload.location` os_type=`./portal-whitesky-cloud customers get-image --customer-id <CUSTOMER_ID> --location=${location} --image-id=${image_id} --json | jq .Payload.os_type -r` name=`./portal-whitesky-cloud customers get-virtual-machine-info --customer-id <CUSTOMER_ID> --cloudspace-id <CLOUDSPACE_ID> --vmid=${vm_id} --json | jq .Payload.name -r` # Execute the checkmk agent installation script based on the OS type if [[ "$os_type" == "Windows" ]]; then ./portal-whitesky-cloud customers execute-command --customer-id <CUSTOMER_ID> --cloudspace-id <CLOUDSPACE_ID> --vmid $vm_id --payload.command "PowerShell" --payload.args C:/Users/user/Downloads/install-agent-win.ps1 --payload.args $name else ./portal-whitesky-cloud customers execute-command --customer-id <CUSTOMER_ID> --cloudspace-id <CLOUDSPACE_ID> --vmid $vm_id --payload.command "/bin/bash" --payload.args /root/install-mkagent.sh --payload.args $name fi done -
Run the
execute-agents.shscript../execute-agents.sh -
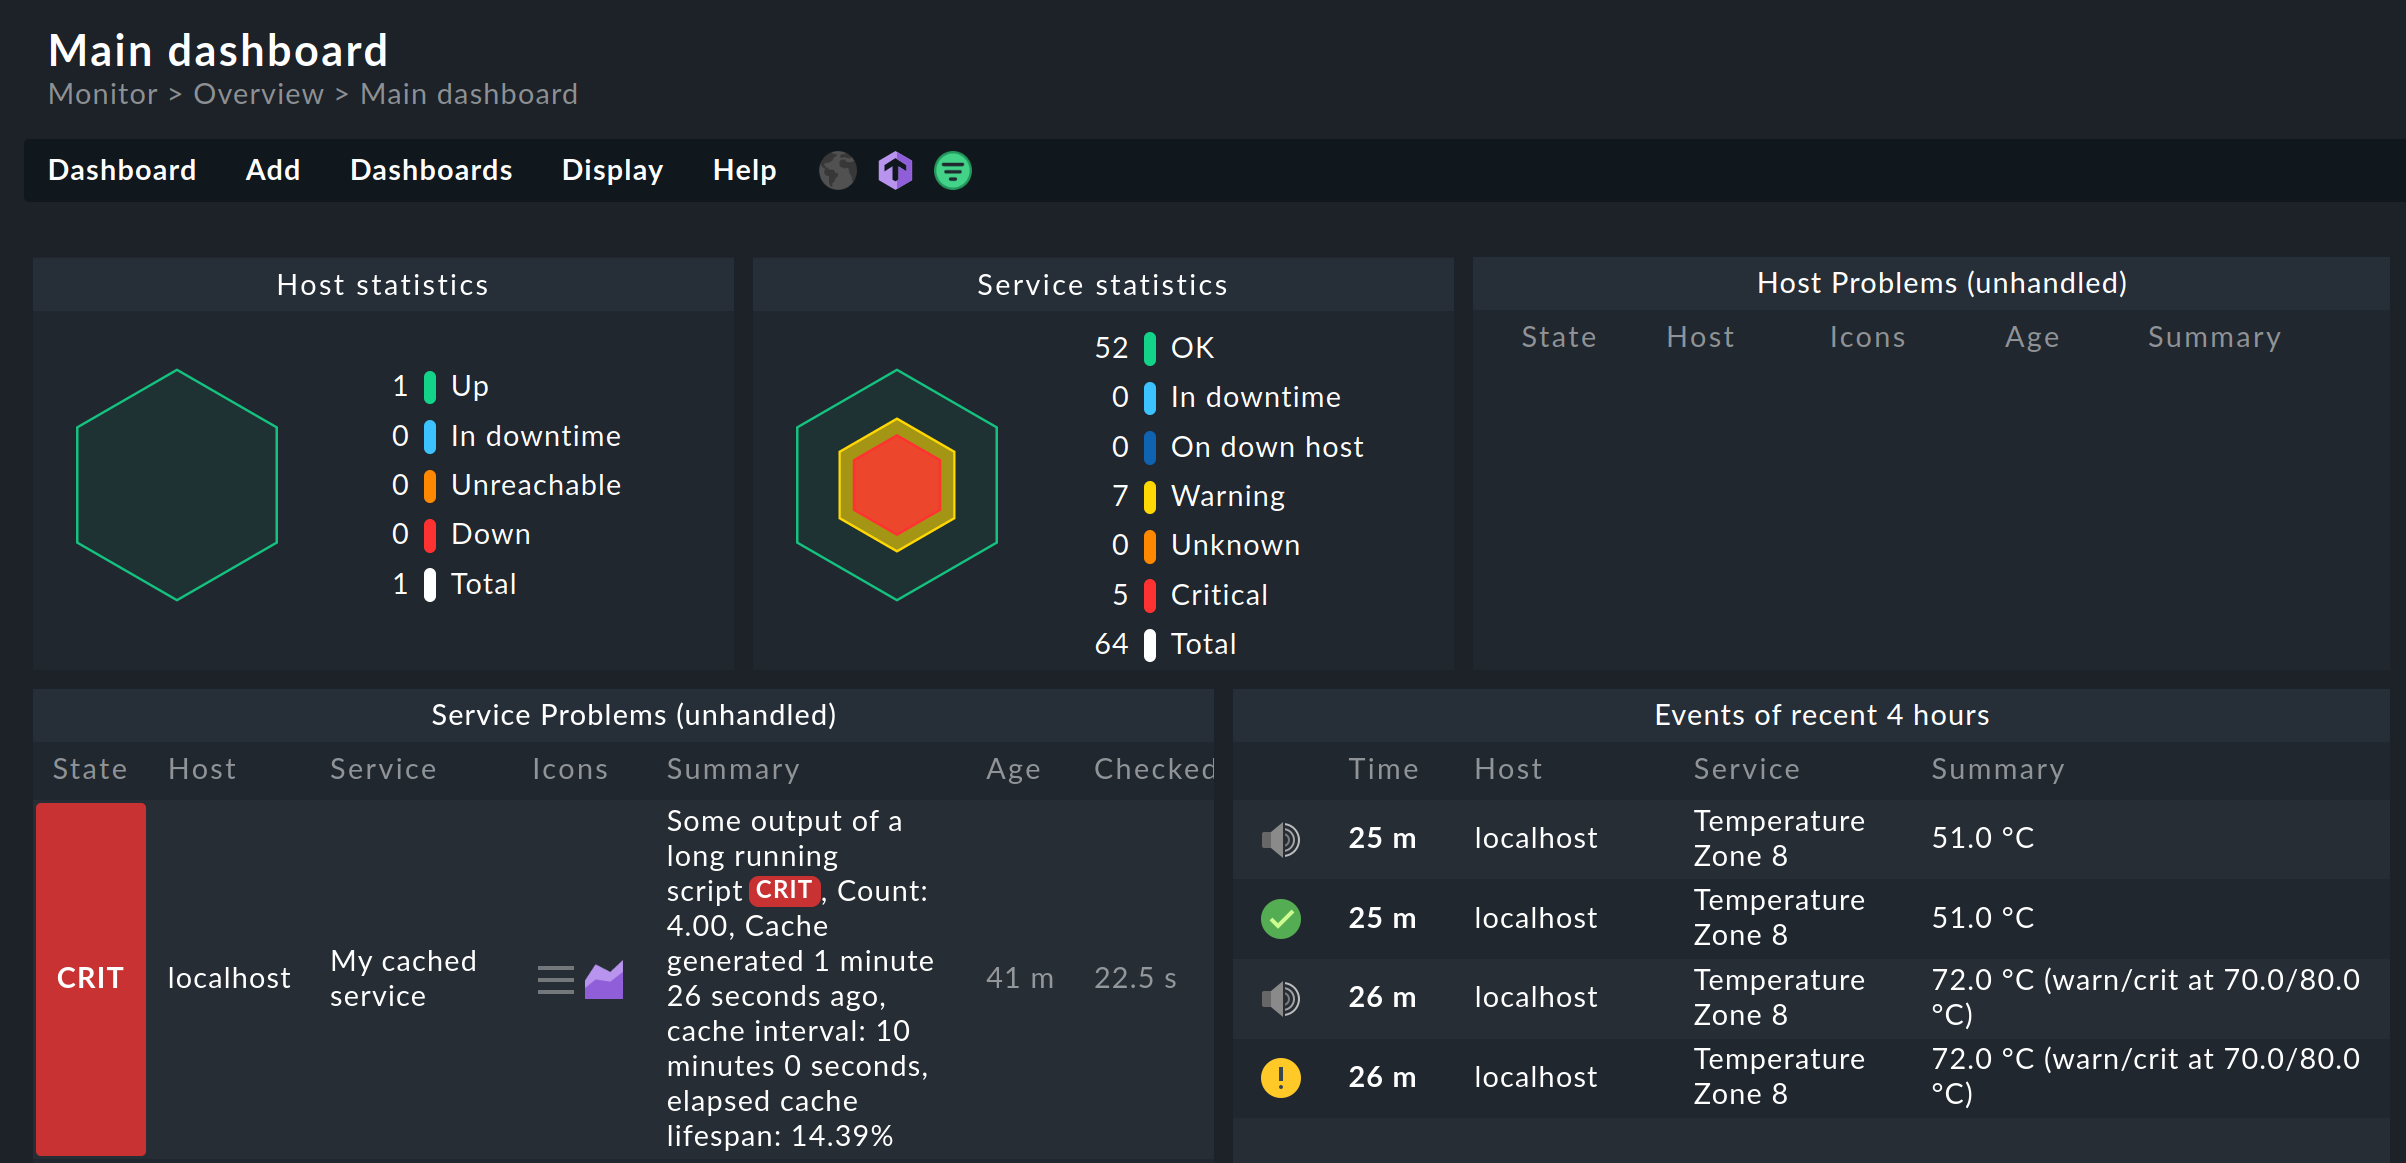
You can find all your hosts on your Checkmk dashboard that runs on your server VM. Open each host and select Hosts > Service Configuration from the top navigation drawer.
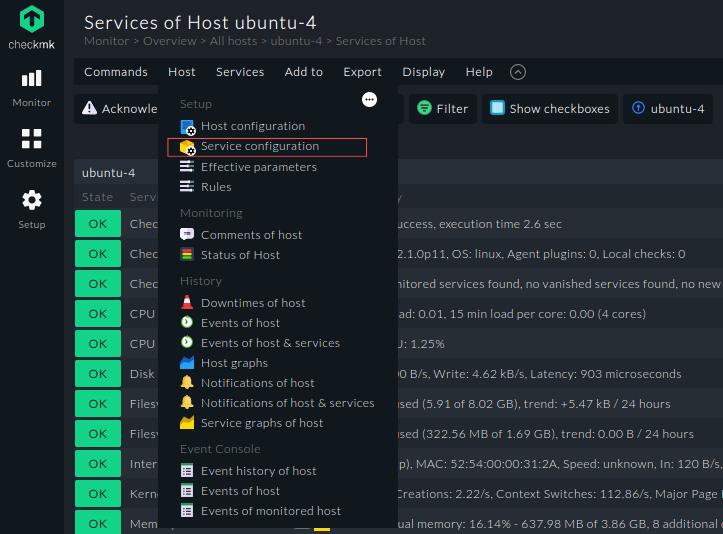
-
Click Accept all, and then save your changes by clicking the Apply changes icon on the top right of your dashboard, and finally click Activate on selected sites.
