Ingress
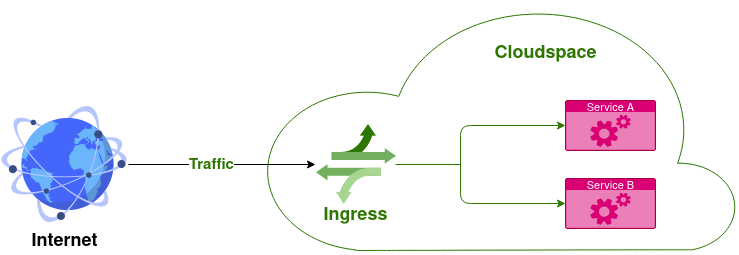
Ingress ensures that your cloudspace can be accessed by the outside world. It allows traffic to come into your cloudspace. The external traffic could be via Hypertext Transfer Protocol (HTTP) or Hypertext Transfer Protocol Secure (HTTPS).
Objectives
- Explain Ingress Resource
- Server Pools
- Reverse Proxies
- Load Balancers
Ingress in Action
As mentioned before, Ingress ensures your services' availability and consistency with the requests coming from external services and their traffic. Like the diagram below, Ingress takes the traffic from outside and distributes this traffic over your services.

Types of Ingress
Ingress allows you to create a Server Pool, Reverse Proxy, Load Balancers and you can even configure it within a text field.
Steps to add Ingress to your Cloudspace
- You must first have a cloudspace, if you don't know how to create one check the cloudspace section in Concepts.
- In the middle of your cloudspace page click Ingress tab.
-
A new list of tabs will appear below the Ingress tab, here you can find
Includes the list of Server Pools that you have created.
Includes the list of Reverse Proxies that you have created and their associated Server Pools.
Includes the list of Load Balancers that you have created and their associated Server Pools.
Where you can edit your Ingress Configuration within a text field.
Server Pools
Server Pool is simply a pool of servers that works under one Name and ID. Each Server Pool has a unique Id, name and description.
Create New Server Pool
- After you click Ingress tab in your cloudspace and choose Server Pools, click Create Server Pool tab at the top of the page.
- Enter your Server Pool Name, the Description field is optional.
- Click Add.
- You will now have the new Server Pool in the Server Pool's list under the Ingress tab.
- Click on your new Server Pool to check its details.
- A list of the Hosts and their Addresses will appear. If you want to add a new host, click Add Host tab at the top of the page and select its type whether IP Address or Hostname or Virtual Machine or Objectspace. More details about these titles in the Concepts section.
Editing and Deleting Server Pool
- When you open your Server Pool page you will find that the Name and Description are editable, just click icon and enter your Server Pool's new name and description.
- If you want to delete your Server Pool, you can delete it from inside the Server Pool page using the Delete Server Pool tab at the top of the page. Also, you can delete it from the cloudspace page under the Ingress and Server Pools tab using the icon.
Reverse Proxies
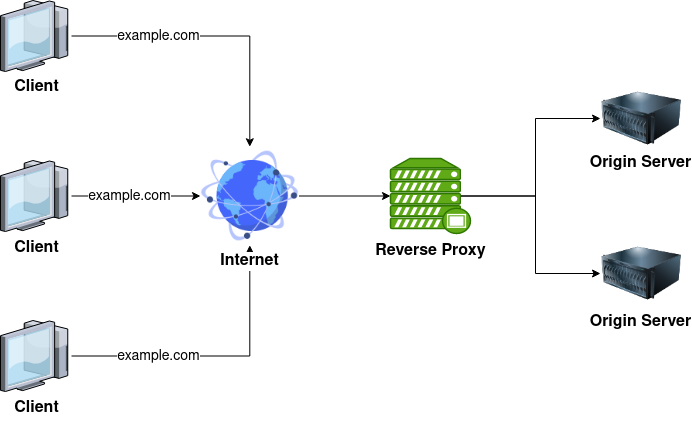
Reverse Proxy is a server that sits in front of one or more web servers, handling requests from clients. This is different from a Forward Proxy, where the proxy sits in front of the clients. With a reverse proxy, when clients send requests to the origin server of a website, those requests are intercepted at the network edge by the reverse proxy server. The reverse proxy server will then send requests to and receive responses from the origin server.

Create New Reverse Proxies
- After you click Ingress tab in your cloudspace and choose Reverse Proxies, click Create Server Pool tab at the top of the page.
- Enter your reverse proxy Name, the Description field is optional.
-
For the Proxy Front-End, enter your domain and the port you want to connect to (e.g port 443), and choose whether you want the scheme of the connection to be HTTP or HTTPS or Both.
If you are using the HTTPS scheme you need to enable Letsencrypt by toggling its button to turn it on, and enter your Letsencrypt Email. However, if you decided to select both schemes, you need to add a port for the HTTP scheme and another port for the HTTPS scheme.
The portal allows you to add your own certificate instead of using Letsencrypt.
Adding personal certificate
- Click Admin tab in the left navigation panel.
- Choose Certificates. Click Add Certificate at the top of the page.
- add your Certificate and its Private Key.
- Click Submit
-
For the Proxy Back-End, select the scheme whether it is HTTP or HTTPS, and enter the Target Port (e.g port 80). Additionally, select the Server Pool associated with the proxy.
- Click Add and wait until your proxy is created successfully.
Editing and Deleting Reverse Proxies
- When you open your reverse proxy page you will find that all the fields you have entered while creating the proxy are editable. Just edit the fields that you want to change and click Update.
- If you want to delete your reverse proxy, you can delete it from inside the reverse proxy page using the Delete Reverse Proxy tab at the top of the page. Also, you can delete it from the cloudspace page under the Ingress and Reverse Proxies tab using the icon.
Load Balancers
Load Balancers are used to distribute the incoming traffic evenly among the different servers to prevent any single server from becoming overloaded. If a server fails completely, other servers can step up to handle the traffic.
Create New Load Balancers
- After you click Ingress tab in your cloudspace and choose Load Balancers, click Create Load Balancer tab at the top of the page.
- Enter your Load Balancer Name and choose the connection type whether Transmission Control Protocol (TCP) or User Datagram Protocol (UDP), the Description field is optional.
- For the Proxy Front-End, enter the port you want to connect to, and choose whether you want to enable Transport Layer Security (TLS) or not. If you enabled the TLS, then you need to enter a domain and decide whether to enable TLS Termination or not by toggling the Pass Through button.
- For the Proxy Back-End, enter the Target Port and select the Server Pool associated with the Load Balancer Back-End.
- Click Add and wait until your proxy is created successfully.
Editing and Deleting Load Balancers
- When you open your Load Balancer page you will find that all the fields you have entered while creating the proxy are editable. Just edit the fields that you want to change and click Update.
- If you want to delete your Load Balancer, you can delete it from inside the Load Balancer page using the Delete Load Balancer tab at the top of the page. Also, you can delete it from the cloudspace page under the Ingress and Load Balancers tab using the icon.
Difference Between Load Balancers and Reverse Proxies
- Load balancers are deployed when a site needs multiple servers because the volume of requests will be huge for a single server to handle efficiently. Most probably the servers host the same content, and the load balancer’s job is to distribute the workload to prevent overloading a server.
- You can think of the reverse proxy as the server's “public face”, it accepts requests from clients for the content hosted on your services which benefits in increasing security, scalability and flexibility. Because your backend servers' information will not be visible outside your internal network, so malicious clients cannot access them directly to exploit any vulnerabilities. Additionally, clients see only the reverse proxy’s IP address, so you are free to change the configuration of your backend infrastructure.
Ingress Configuration
Currently, you can only add new fields to your Ingress file via text field from the Config tab under the Ingress tab in your cloudspace page.