Roles
Role management allows you to control the roles that have access to your resources using the defined permissions for each role. They can Create, Read, Update, Delete and Execute resources. You can also add new roles with customized permissions from the Admin section.
What are Permissions ?
Permissions are the rights and privileges given by the cloudspace owner that define access rights to the cloud resources. Permissions can be the same for multiple roles and unique for others, this depends on every role's responsibilities.
Steps to add a new role
-
Click Admin in the left menu, then click Roles.
-
You can see the list of the available roles on your cloudspace. Click Add Role at the top of the page.
-
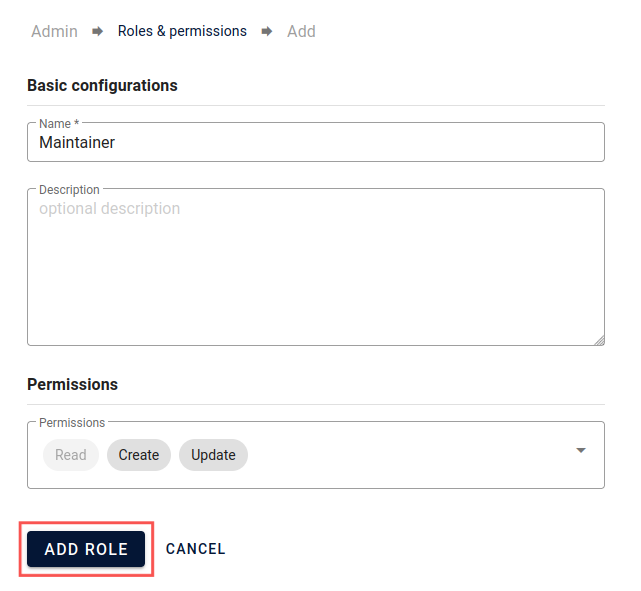
Enter the new role Name, Description (optional), Permissions, then click Add Role.

-
You will find your new role with its permissions added successfully to the roles list page.
How to assign a role to a specific user ?
-
Select the new role that you have created in the roles list and you will be redirected to the role details page.
-
Click Manage Members at the top of the page.
-
You will be redirected to the sub-organizations window inside the Identity and Access Management (IAM) section.
-
Click Invite User at the top of the page to add a new user under the new role that we have previously created.
-
Select whether the new user will be an owner or a member in your organization, then enter his email and click Add User.
If a user is an Owner in the organization, then he will have the right to invite or delete members and owners. However, if he is a Member he won't be allowed to invite or delete members.
-
You will be redirected back to the users of your organization list where you can find the new user that you invited with a pending status until he accepts your invite to the organization.
-
If you want to delete a user just click and click Confirm to confirm this action.
Now our user has a role with defined permissions that allows him to do multiple operations on the portal.
Granting customer access to your new role
-
Open the New Role Details Page.
-
Click Grant Customer Access at the top of the page.
-
Click Confirm to confirm the action.
-
You will see a New Customer Grant added to your Role Grants List.
Granting access within resources
Cloudspaces
- Open your Cloudspace, then click More.
- Choose Roles & Permissions from the menu.
- Click Grant Role Access at the top of the page.
- You will be redirected to the roles granting page where you can choose the role you want to grant access to the Cloudspace.
- Select the desired role from the roles list, then click Grant Access.
- You will find the new role added to your Roles & Permissions section in your cloudspace.
You can revoke the access from roles within Roles & Permissions section in your cloudspace by clicking on the X icon under the actions of each role.
Virtual Machines
- Open your cloudspace, then choose the VM that you want to grant the role access to.
- Click Roles & Permissions.
- Click Grant Role Access at the top of the page.
- You will be redirected to the roles granting page where you can choose the role you want to grant access to the VM.
- Select the desired role from the roles list, then click Grant Access.
- You will find the new role added to your Roles & Permissions section in your VM.
You can revoke the access from roles within Roles & Permissions section in your VM by clicking on the X icon under the actions of each role.